Softball keeps players in direct sun for hours, and a visor solves two problems a full cap does not: it clears the crown of the head for a ponytail and it moves a lot more air. That is why fastpitch dugouts, rec leagues and travel teams order visors by the dozen every spring. The catch is that a $5 blank and a $13 blank look almost identical in a product photo and feel completely different in the fourth inning. This guide walks through how to pick a custom softball visor that holds up to a full season and looks right with your team’s logo on the front.
Why softball teams reach for visors instead of caps
The practical case for a visor is airflow and hair. An open crown lets heat escape and leaves room for a high ponytail, which is the single most common reason players ask for visors over structured caps. Visors also sit comfortably under a batting helmet, so a player can keep the same headwear from the on-deck circle to the field. The trade-off is coverage: a visor shades the eyes and face but leaves the top of the head exposed, so teams that practice in open sun sometimes pair visors with sunscreen or keep a few caps on hand. For most spring and summer schedules, the ventilation wins.
Fabric is what you are actually paying for
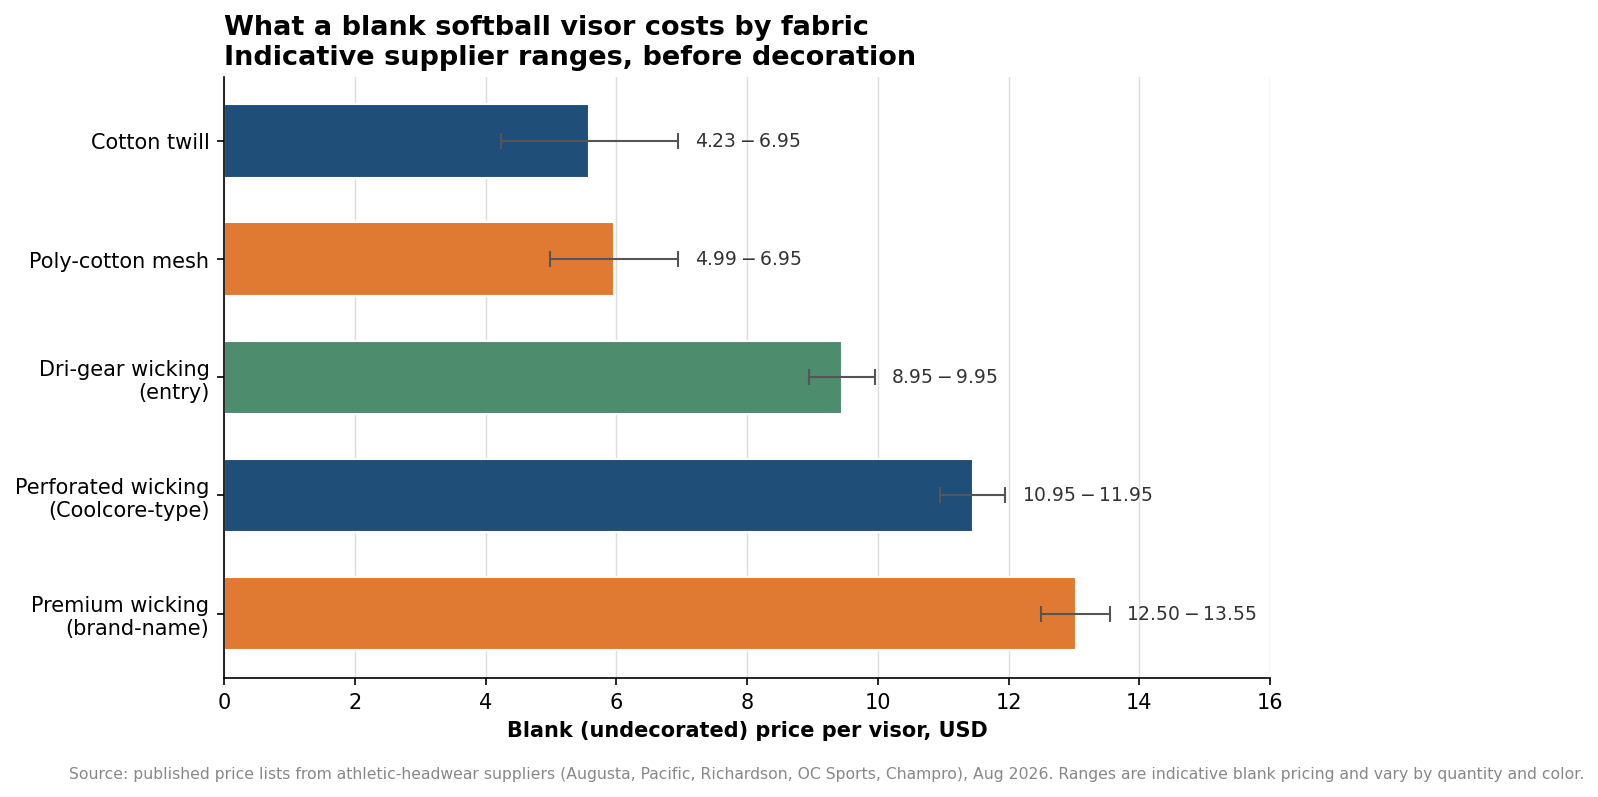
The visible difference between a cheap visor and a good one is the fabric, not the shape. At the low end, cotton twill and simple poly-cotton mesh run roughly $4 to $7 per blank. They decorate cleanly and are fine for a one-day tournament or a giveaway, but cotton holds sweat and dries slowly, which shows by the end of a doubleheader. Step up to a moisture-wicking poly knit and you are typically in the $8 to $10 range; these pull sweat off the sweatband and dry between innings. Premium wicking visors with perforated panels or cooling treatments (Coolcore-type fabrics, or brand-name shells like Richardson’s) sit around $11 to $13.55 per blank. For a team that wears the visor three or four times a week all season, the mid-tier wicking fabric is usually the sweet spot: noticeably more comfortable than cotton without the premium price.
One detail worth checking is the sweatband. A terry or brushed moisture-wicking sweatband is what keeps sweat out of a player’s eyes, and it is the part that wears out first. If a supplier lists the shell fabric but says nothing about the sweatband, ask before you order a full roster’s worth.
Fit has to work across a whole roster
A team order is not one head, it is fifteen. The most forgiving option is an adjustable closure: a hook-and-loop (Velcro) strap or a slide buckle that covers roughly a 6 3/4 to 7 3/4 head range in a single size. Most adult athletic visors are sold as one-size-fits-most for exactly this reason. If your roster includes younger players, order a youth size rather than assuming the adjustable adult band will cinch down far enough; it usually will not sit low enough on a smaller head. The brim itself typically runs about 2.75 to 3.25 inches, long enough to shade the eyes without blocking a fly ball. A pre-curved brim ships ready to wear; a flat brim gives a cleaner surface for a large front logo if that is the look the team wants.
Embroidery or heat transfer for the logo
Team logos on visors are usually embroidered, and for good reason. Stitching sits well on the flat front panel of a visor, survives repeated washing and reads as the higher-quality option, which matters for a team that reorders the same look each year. Embroidery is priced partly by stitch count, so a simple two-color mark costs less to run than a dense, detailed crest. For player names or jersey numbers, and for logos with fine gradients or photographic detail, a heat-applied transfer is the more practical choice: it reproduces small text and complex art that thread cannot, though it does not have the raised texture of stitching. A common approach is an embroidered team logo on the front and heat-pressed numbers on the side for individual players. Send vector art (AI, EPS or a high-resolution PDF) so the decorator can digitize the logo cleanly; a low-resolution web image almost always has to be recreated, which adds time.
How the quantity changes the math
Custom visor pricing is driven hard by order size, because most of the setup cost, digitizing the logo and threading the machine, is a one-time charge spread across the run. Order two dozen and you are absorbing that setup across a handful of pieces; order a few hundred and it nearly disappears. Many suppliers set their best price break around 144 pieces, and advertised decorated prices bottom out near $4.99 to $5.50 per visor at the high volumes a league might buy. A single travel team ordering 24 to 36 pieces will realistically pay more per unit, often in the $9 to $12 range once a logo is included.
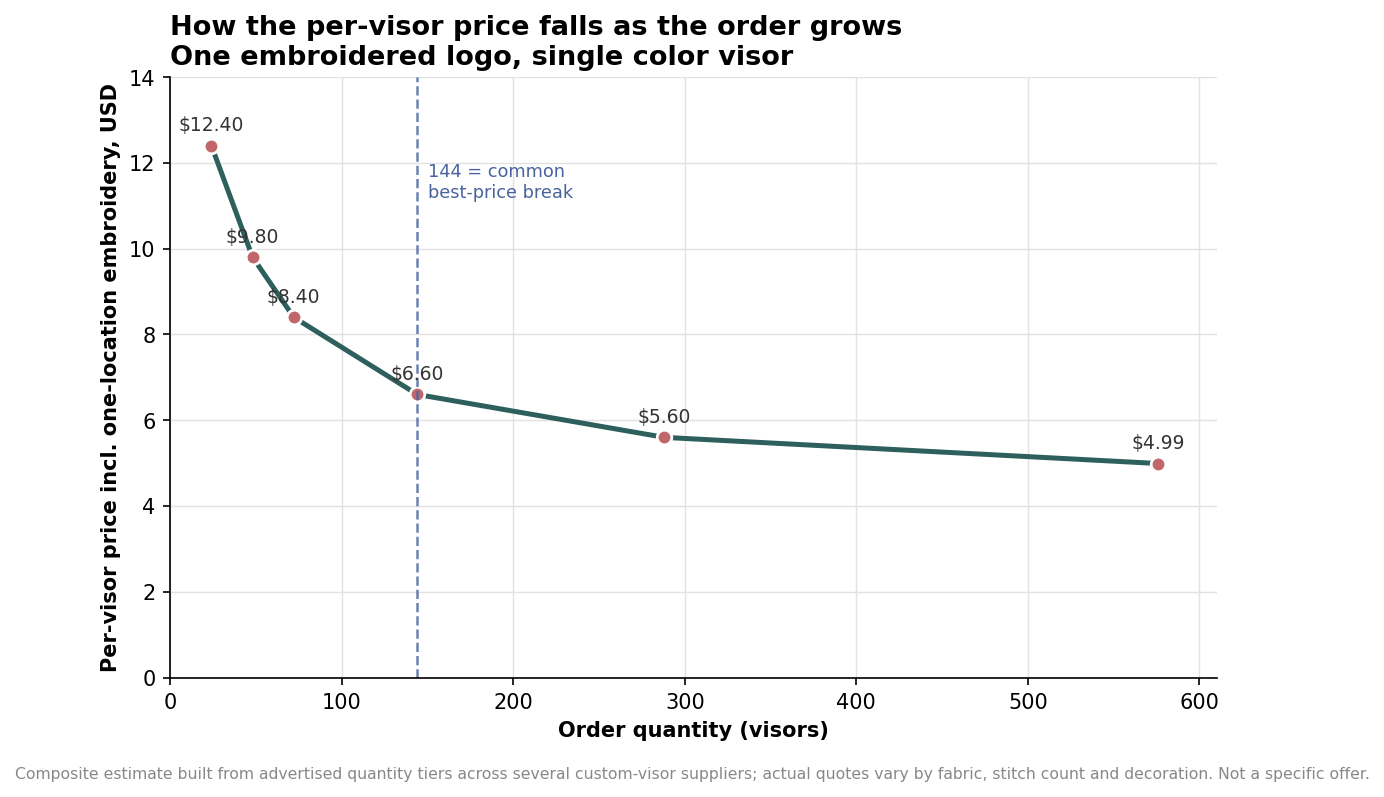
If your league buys for several teams, pooling the order into one run is the most effective way to lower the per-unit cost, provided every team is willing to share a base visor color and change only the front logo. It is also worth asking whether the one-time digitizing fee carries over to next season’s reorder; with most decorators it does, so the second year is cheaper than the first.
Specifying an order you will be happy with
Put four things in writing before you approve a proof: the fabric (name the specific wicking or twill model, not just “visor”), the closure type and size range, the decoration method for each element (embroidered logo, transfer numbers), and the exact thread or transfer colors matched to your uniforms. Ask for a physical sample or a stitched-out proof on anything above a hundred pieces, and confirm the production lead time in writing, since embroidered team headwear commonly runs about two to three weeks after art approval and longer in the spring rush. Figures here are indicative ranges drawn from current supplier pricing rather than a specific quote, so use them to set expectations and get your own numbers before committing a full roster.